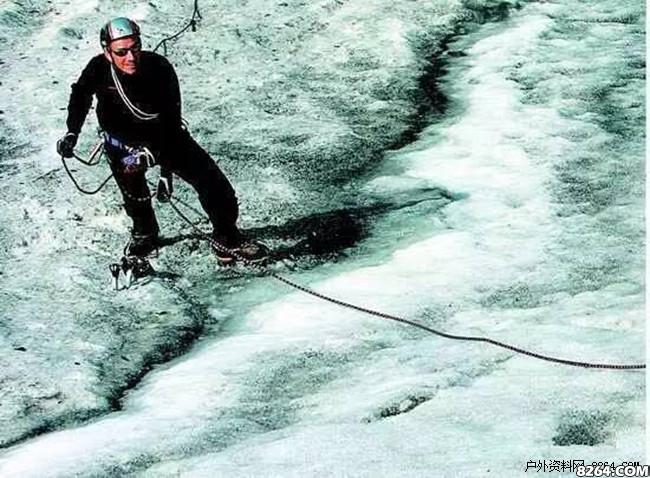
In the winter, with the ice and snow, the body wakes from hibernation, when the white ice wall shines under the reflection of the sun, a helmet, a polarizer, a pair of ice crampons, a pair of crampons, a safety rope... Fairytale world, looking for physical and mental outdoor stimulation!

Rope climbing is often used in climbing and climbing ice. Unless the team believes that cordless climbing is more safe and secure, it does not use rope. For example, when there is a storm, when the weather is too late, it is not advisable to use a rope to walk in a canyon. People are easily injured by rolling rocks and do not use ropes for the safety of the whole team.
At this time, it is relatively safer to disperse and walk faster than to walk at the same speed along the ropes. Therefore, it is not appropriate to knot ropes in terrains that are difficult to help each other, because if one person slips, others will be torn down.

The actual knot protection on ice uses a knotter, knot and several points of protection in the middle. This is the same as walking with a group rock climbing and a grouping snow slope. The rope knot is fixed first, the first person climbs up a slope along the rope, and then fixes another knot rope cone, along which the people behind it climb up. The leader can change halfway.
Ice protection
Modern use of ice silk has greatly enhanced the safety of ice climbing. However, fixing them in ice is also time-consuming and labor-consuming, thereby reducing safety on the other hand. When teaming up on ice, the leader’s use of protection points is limited by rock formation. At the same time pay attention to the use of natural protection points.
Natural protection point
In mountain glaciers, it is not easy to find ready-made protection points, but people can use tools to process the protection points as a fixed column of tethers. Good points may not always be on ice. Generally, rocks near the line or out of the ice can be used.
There are many natural protection spots on the icefall, especially around the icicles. Ice climbers can also use some of the less commonly used protection points. In icefalls or high mountains, the large icicles are only about 1-2 inches apart. Tied off with webbing ice screws can be used behind the icicles. Sometimes ice and ice can be found. There is a gap between the lower rocks. At this time, ice screws (grouped with net ropes) can be inserted into them as anchoring piles.
Another way is to cut two eyes on a piece of ice, put in a runner, and fix the rope. In rock and ice mixed terrain, it can be nailed into ice.
Natural bollard
Natural mooring columns are the most used in ice climbing. Cut directly into ice cubes. Pick a piece of ice without cracks or holes. The harder it is, the better. Use a pointed tip to make a beaded outline. The widest point is 30-40 cm in diameter. Drill a groove around the "waterdrops", at least 15 centimeters deep.
The chiseled natural tether column looks like a drop of water from the front, looking like a ram's horn from the side. As long as the ice is strong enough and hard, the tie string will be stronger than the rope.
The two tiestrings can be joined together, pull the rope down and pull up, which becomes a two-way fixed cone.
Be careful with the chiseling tether column. The wide part of the "waterdrop" is where the rope is forced. To cut it into a slot, you can "buckle" the rope. But never crack the ice.
Spiral cone
The preferred place for the fixing screws is the natural recess, because the cracks that are screwed in the recesses do not easily spread to the ice. If it hits the bulge, the ice will crack so badly that it is not safe.
When this happens, remove the screws and drill them 1-2 feet away. In general, the two wires on the ice should be at least 2 feet apart, and they should be farther apart on the melted ice to prevent one underwire crack from spreading to the other and sticking the two together.
According to different ice conditions, the procedures for fixing the screws are also different, but the general steps are as follows: First, dig a small hole with a tip or a dovetail, and dig the hole to lightly tap the ice surface to prevent The ice surface is broken and put into the screw, screw thread or screw teeth and holes firmly. The direction of the nails is towards the mountains, and the angle is 45° to 60° from the direction of the pull rope. (When the ice surface is hard, you can put the nails and then lightly tap the screws a few times to make the threads really bite.)
Sometimes the ice surface will melt, or it will be covered with a layer of new snow. At this time, you will use a horizontal cross hole to remove a layer of soft snow (ice) from the surface until it is strong enough. On ice that is very severely melted, dig out a large level step with a pickaxe, drill the screw vertically down at the back of the bench and press the screw down firmly while twisting the screw into the ice.
If the glaciers are cracked and spread to the surface, just cut the broken ice sideways (using the tip of a file) and continue to screw in the screws. This is still safe.
Screws with sharp teeth can sometimes be screwed in by hand. If this is not possible, use a spanner to pass through the eye of the nail and screw it in. No wrench can use another ice nail or tip.
The eye that screws the nail to the nail is already on the ice and is very firm. Secure the screw eye with the iron lock, with the keyhole facing downwards. In order to prevent the ice from melting in summer or in the sun, a pile of ice can be piled on the screw head.
If the screw can only be drilled into a shallow place, in order to reduce its stress, the screw can be connected to a slip ring on the empty surface and the string can be threaded into the slip ring.
People are physically and mentally tired when climbing a steep ice wall. In order to save physical strength and improve the efficiency of ascent, use screws as little as possible. If the ice is hard and strong, or the slope is not particularly steep, one or two guard points on a slope will suffice. Unless the ice has melted, a protection point only requires one screw.
Fixing one screw usually requires two hands, and it must be very careful on extremely steep ice. In order to save effort, two hailstones can be fixed above the body and the arm can be put into the belt cover on the crotch. Or fix two hailstones and connect the upper belt cover and the waist belt with two iron rings.
From a moderately steep slope to a steep slope, you can drill a step as a foothold and fix the screws. However, if it is on a very steep slope, it will be avoided because it is particularly difficult. If you want to install a spiral, use the front kick method to stand firmly, fix the screws as soon as possible, and continue climbing.
Tether protection on ice
If you are the first person in the group, be careful to find a good tether when climbing up a slope. A recessed or less steep ice surface is acceptable. Drill a hail on one side of the body and attach the rope to the pole as a temporary protection. Then cut a step and stand on the step and face the ice wall.
Tether cone
The two screws form a standard tether cone. At the waist-to-chest height, slightly tighten the first screw. Use an iron lock to connect the seat belt, climbing rope and ice screw. A lilac knot or knot.
Then fix the rope temporarily fixed on the hail and pull out the cocoon and pry it over the outside of the screw. Secure the hail and screw together with a leather strap or slip ring as the backing of the tether cone. Inform the grouping companions below that you have stopped the grouping.
At this point, the second screw is fixed. Fix it on top of you, 2-3 feet from the first one. Pull the rope to the second ice screw and attach it to a clove knot. Use iron locks to attach the ice screw to the rope. The rope between the two screws must not be loose. Such a tether cone is completed.
Next step: Use the iron lock to lock the second screw with the brake cable. The following players are pulling ropes from here. When the following players also climbed here, the tether cone became the first protection point on the next ice slope.
Tether method
You can choose the mechanism tether tool, munter knot (sailor knot) or seated tether method selection can be based on personal habits and the stability of the ice cone (tie string). The seated tether method is large in activity and stops slightly when the person slips, but the tether cone is relatively less stressed and has less influence on the protection point.
Institutional tools and other munter knots are not so flexible. They can be held when a person slips. However, the tether cones and intermediate protection points are very powerful.
Mechanical tools
Many people use this standard set of tools and can actually tether directly from the ice vertebrae.
Sitting tether
Facing toward the ice wall, pass the brake rope through the iron lock on the waist and around the back, and then use a single iron lock to connect the rope to the first screw. Finally, hold the rope with your hand to brake. This method is particularly suitable when the rope is hard frozen.
Fasten the ice boots with the screws
This method is most suitable for flat and gentle slopes. First, fix the screw, put on the iron lock, pass the brake rope through the iron lock, and put the foot of the mountain on the screw, perpendicular to the direction of the pull rope. Be careful to let the crampons in the middle of the boot pass through the iron lock. Do not step on the rope or stretch the rope to wind the rope.
The tightness of the rope can be determined by the number of turns tied to the ankle. It is also possible to adjust the distance between the shoe extension and the iron lock extension. If someone falls, pull the rope slowly upwards.
There are two useful methods. One is to use a pear-shaped iron lock (diameter is suitable for playing a munter knot). One of the methods is to hit a munter knot directly on the iron lock, instead of winding the rope around the ankle. The second method can make you stand still. Can brake.
If a worker wants to do something good, he must first use his device to climb ice in winter. The equipment is the foundation. Facing the smooth snow and ice ground and the complex and challenging terrain, we must master the knowledge of ice climbing and select safe and reliable equipment to make this winter passable. More exciting!